Creating Web Pages (Nov 98)
Over the next few issues of our TXT Newsletter I will continue my tutorial on Creating Web Pages. This month we will add to page we began last month. We will add some graphics to that page. One important consideration when adding images to a page is that they take much longer to load than text. If you have a lot of images on one page the Net-Surfer you are trying to attract may get tired of waiting and go to another site instead of waiting for your page to complete loading.
Here are a few remedies for this.
1. Keep the size of graphic files as small as possible!
-----To do that use JPEG or .jpg files when possible. They are highly compressed, can display 3 million colors and use much less disk space, hence they load quicker. (try to avoid using picture files much over 50 - 60 K bytes)
-----Next to JPEG's the next best file format is .GIF files. These are not as highly compressed use up to 256 colors, but have the advantage of allowing you to create both animated pictures and transparent backgrounds which seem to just float on the page.
Note: A GIF file can actually be smaller than a JPEG if you don't need more than 16 colors.
-----Never use a bitmap file (.bmp) on the Internet!!! They are HUGE!
2. Make sure that you include some regular text near the top of you page. This will come up quickly and give the Net-Surfer something to do while the rest of your page is loading. (This way they are not as likely to hit the BACK Button to leave your site.
3. If you are loading many pictures on a page, consider making two versions of the picture. Use a small one called a thumbnail which is linked to a larger picture & bigger file which won't be loaded unless the surfer really is interested in seeing that image. (Thumbnails are both visually smaller and smaller by file size.)
4. Instead of creating very long pages that have to be scrolled down forever, make shorter ones that have a link at the bottom to the next page. Even if you are using a common logo on each page, this image will load immediately after the first page since that file will load from the surfer's cache. (It loads from a file on the harddisk instead of downloading it again. That is why a page loads much quicker when you hit your back button.)
OK those are a few things to remember when you design your pages. Here is an explanation of the code needed to insert an image into your page.
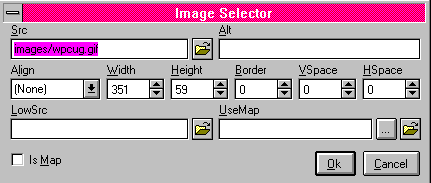
<P ALIGN="Center"><IMG BORDER="0" WIDTH="351" HEIGHT="59" SRC="../images/wpcug.gif">
P align="center" will center the image horizontally
<IMG BORDER="0" WIDTH="351" HEIGHT="59" SRC="images/wpcug.gif">
This inserts the picture called "wpcug.gif" which is in the "IMAGE" folder. It also puts no border around the picture sets the image height and width to the above sizes (these were the default values, but they can be changed to shrink or enlarge the picture. If you are using a web page editor like FlexEd the following dialog box is what you would work from...
What do you think of having "The TXT" on-line? E-mail Bob Pajot ---> rdpajot@netcore.ca