|
Creating Web Pages (continued) (Sept 99) Gifcon.exe allows you to do many thing besides linking gif files to create animation and we will cover some others later. But for nowů When you start up GifCon you will go under the FILE Menu and access Animation Wizard which will guide you through the process.
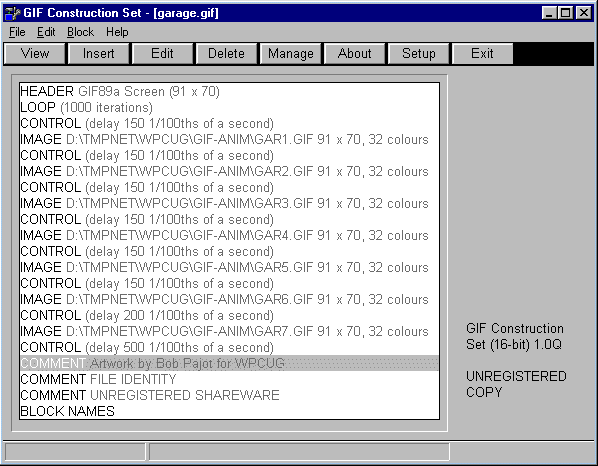
The new animated file has all of the above information saved in it. Here's what it all means.
HEADER element identifies the file type.
LOOP element tells how may time the animation should be run.
CONTROL element instructs how long the delay is between images.
IMAGE element tells the program where to find the original image on the drive or floppy.
COMMENT element allows you to put a comment directly into the animated file which doesnĺt do anything but will allow you to identify the file as your own at some later time.
If you find that things arenĺt quite right with your animation, it can be edited quite easily. For instance, lets say the you want to increase the delay between two of the images. Find the spot where the problem is and double click on that CONTROL header. A dialog box pops up so you can change the delay and if you want you can also change the background to a transparent color by just clicking on the Eyedropper and then using it to click on the color you want to disappear. You can then View it from the dialog box then if itĺs correct just click OK.
I know that all this may sound complex but the above animation can be done in about five minutes or less after the initial images are completed. Here Is The Finished Product
GIF Construction Set is a great little program to work with. It is very intuitively designed and has excellent help available at the touch of a button. If a help button is not available for what you are working on at the time just hit F1 and there it is, HELP on exactly what you are doing.
This program also allows you to create animated banners and LED Signs like the one we have on our Homepage announcing The Featured Site Of The Month. You access that function by going to the Edit Menu and choosing LED Sign.
Here you are allowed many Options to control the appearance and display of your LED Sign, such as Loop, Smooth Scroll, Sign width and several other components.
You can control the colour of each individual letter in the sign if you wish. To specify a colour just type @R for red, @G for green, @B for blue, etc. List of colours available from HELP.
For example @Ythis is a test would scroll this is a test in yellow.
You would then SAVE As a filename and that is it. How much easier could it be?
The time necessary do this is only a couple of minutes. Well, thatĺs it for this monthĺs installment. . Next month we may continue with more on Internet picture files. Please let me know what youĺd like to see in future editions. You can reach me at webeditor@wpcug.com Read Another Issue Of The NewsletterReturn To WPCUG Homepage
 E-mail me at
webeditor@wpcug.com E-mail me at
webeditor@wpcug.com |